SPLIT-CANE FLY RODS
HANDMADE BY
DON ANDERSEN
Indicator Systems
For all water types and depths
Over the past forty years I’ve experienced with various types of indicator systems for fishing nymph patterns in all water types and depths. An article in Field and Stream magazine in the late 1960’s started me on the concept of using indicators. To this point, I’ve worked up a number of indicator systems. Some of them are of my design, others I’ve borrowed. The indicator systems are used for various water types, from stillwater ponds or flowing waters to deep water indicator fishing in lakes. The directions for construction and use are contained within each of the sections.
I originally used panfish popper corks ¼” OD by 1” long that I got from Herter’s. I would cut them in half and drill a hole through the cork with a heated sharp needle. To increase visibility, I painted them with bright yellow model paints. The leader was threaded through the hole and held in place by the use of a flat toothpick. While they lasted OK, the visibility of the ¼” diameter cork was limited. So I searched some more. On a trip to the west coast, I ran into “Corkies” by the hundreds painted in the garish colors required for steelhead/salmon rigs and came home with a bunch. Like the cork indicators, they were held in place with toothpicks. Unlike the panfish corks indicators, the Corkies were made of foam and hole through them wore quickly and the paint chipped off quickly. Both the corkies and panfish indicators had the same failings; hard to see, not sensitive to light strikes, heavy and they landed like a ton of bricks.
During a trip to Armstrong’s Spring Creek west of Livingstone, Montana about 20 years ago, I was shown a nifty yarn indicator that could be used for fishing very small flies or emergers in the film. I used the indicator system over the next couple of years and really liked its performance for small flies. For large flies or heavier water it had limitations that only could be resolved by using larger denier yarns with the indicator much larger in diameter. What I needed was an indicator system readily adjustable for water depth, would float well, easily cast and be highly visible. After experimenting with yarns of various types, I found that macramé yarn offers the best solution and has been my method of choice for 10+ years. Macramé yarns are tough to find with the only supplier I am aware of is net based https://www.macramesuperstore.com/ Larger craft stores never seem to have any. Further, the yarn indicator system has now expanded into lake fishing for very deep water from 10 to 30+ feet. Detailed below are the five methods I use for indicator fishing. Each of them has their place in successful nymph fishing.
METHOD # 1 DRY/DROPPER INDICATORS
Discussion:
Dry/dropper combinations are very effective and their construction is covered in numerous magazine/books/internet articles.
Use:
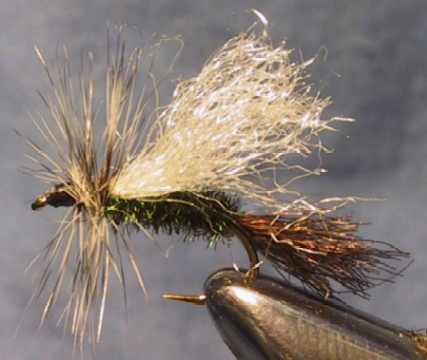
I tie the leader to the eye of the dry and the nymph leader to the eye of the dry. The dry tends to stay at right angles to the leader thereby increasing hooking efficiency. I use a high floating dry fly for nearly all of my dry/dropper fishing. The CFF fly was developed, in part, to serve as dry fly that couldn’t be sunk.
METHOD # 2 SHALLOW STILLWATER FOR PICKY TROUT
Use:
This is by far the easiest system to use. By utilizing a tiny bit of Muclin Brand line floatant on the leader, the angler can see the minutest twitch of a fish mouthing a fly. I use either the Red or Green Tin Muclin line floatant. I usually fish this type of indicator with flies of very little weight relying on the weight of the hook to slowly sink the fly. Unweighted wooly buggers tied on 2>4XL 2XF hooks work really well.
Construction:
If the pond is two feet deep, apply the floatant about three feet above the fly for a distance of about 2 feet. Reapplication of the floatant will be required about every hour or so as it is removed by casting or fishing. I run the leader between my thumb and the floatant while pressing lightly. Do not touch your fly after the application of the floatant. While other line/fly dressings may work, they wash off the leader quite quickly.
YARN TYPE NYMPH INDICATORS
Advantages of yarn indicators:
1] They are very sensitive to even the slightest movement of the fly.
2] The yarn material is cheap – 100 yards is about $10.00
3] Tools and glues are readily available
4] They refuse to sink! Even after being drawn below the surface of the water they
will refloat readily.
5] They cast readily and land quietly making the soft presentations often required.
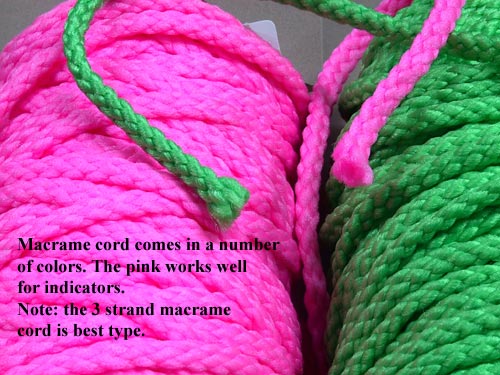
6] Many colors of the yarns are available so the angler can use the ones that
suit light conditions – I personally like a pink indicator for lake fishing
and white or bright green for streams.
7] Yarn indicators last a long time, perhaps as many as several hundred trips.
They will get dirty and need cleaning now and then. Thread the loops on a spoon
and hold in place with a clothes peg, place in your dishwasher and wash them.
Remove them before the heat cycle.
8] Commercially available yarn indicators utilizing rubber “0” rings or the
like do not float as well as ones using monofilament in the construction. Further,
they are heavier to cast.
The description below plus the attached pictures demonstrate the methods I use to build the three types of yarn indicators.
Method # 3 - 0>2’ style for small flies and emergers
Method # 4 - 0>9’ style for larger flies or heavy water
Method # 5 - 8>30’+ for deep water indicator fishing
METHOD #3 - 0>2' STYLE FOR SMALL FLIES OR EMERGERS
INDICATOR CONTRUCTION:
Discussion and Use:
This type of indicator is most useful for tiny flies or for fishing emergers and the like in the film. The indicator yarn is inserted into the tippet knot located two to three feet from the fly. If you wish to remove the indicator, just pull on the ends of the yarn and it will slid from the knot. Retighten the knot. This type of indicator has served me well for about 20 years.
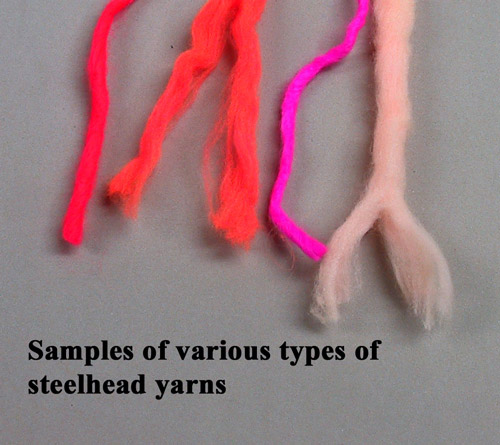
Required tools – very sharp scissors – steelhead yarn is tough to cut
Required Materials – Steelhead egg yarn material – available in many bright colors
Floatant – Gink or equivalent
To construct:
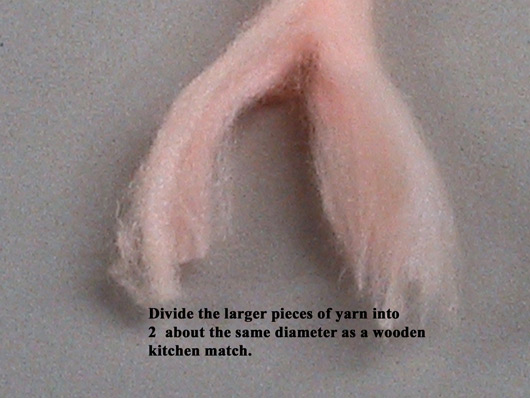
1] Cut a section of steelhead yarn about 1 ¼” long by a match stick diameter in size
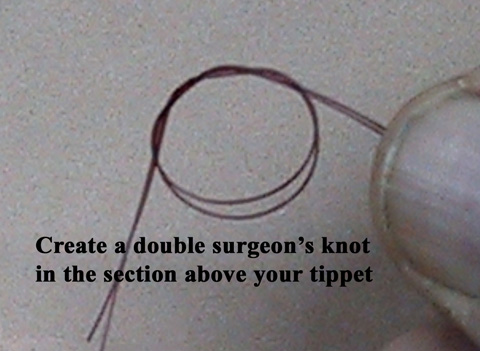
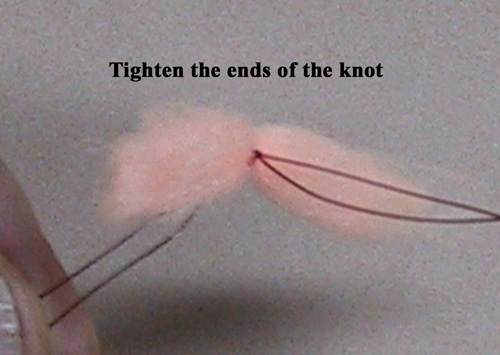
2] Put a double surgeons knot into the tippet/leader leaving a ½” OD loop
3] Insert the match-stick sized piece of yarn into the double surgeons knot
and tighten knot
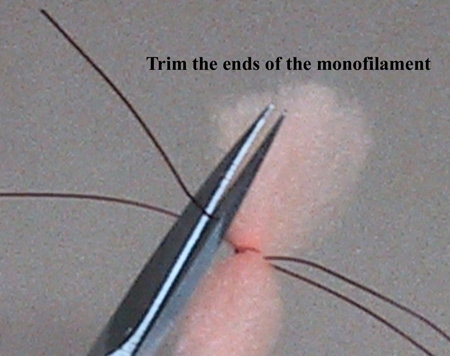
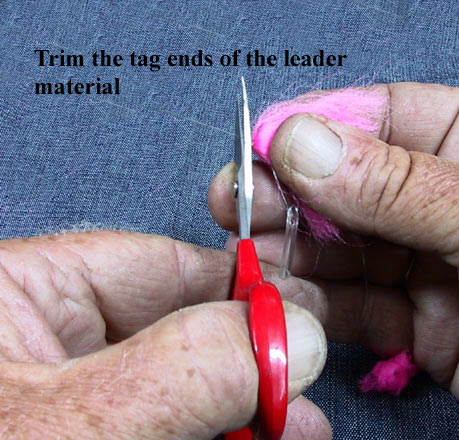
4] Trim leader ends
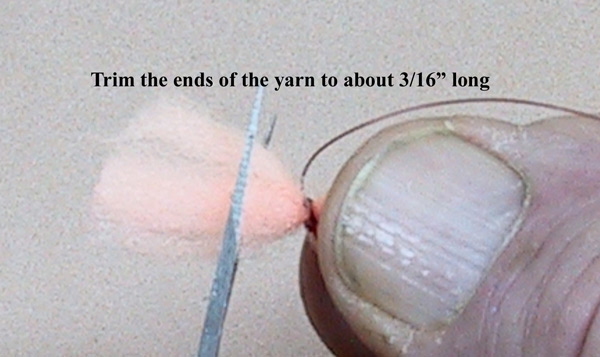
5] Fluff the steelhead yarn into a ball about 3/8” OD
6] Trim the steelhead ball to about ¼” OD with the scissors
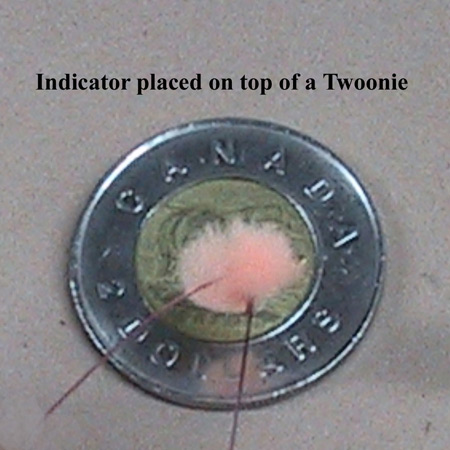
7] Place a touch of floatant on the ball.

Click for a larger photos and step by step instructions.
METHOD # 4 - 0>9’ STYLE FOR LARGER FLIES OR HEAVY WATER
INDICATOR CONTRUCTION:
Discussion and Use:
This type of indicator works well when fishing any weight of nymph pattern. Larger diameters of yarn, will of course, readily float heavier flies. To use, place a number of overhand knots along the length of your leader from 6” off the line/leader connection to about 5’ of the fly assuming you are using a 6 lb. tippet. Make a loop in the leader, slide the indicator loop through it, slide the indicator through the loop and tighten. With the knots placed at various points, you can move the indicator up or down the leader as required by water velocity or water depth. I usually use this yarn indicator when fishing streams like the Ram or Crownest utilizing two nymphs tied in tandem. I also use this type of system on lakes from 3>9’ water depths. Of the three types of yarn indicators, I find Method # 4 the most useful.
Required tools:
1] Scissors
2] Smooth jaw pliers
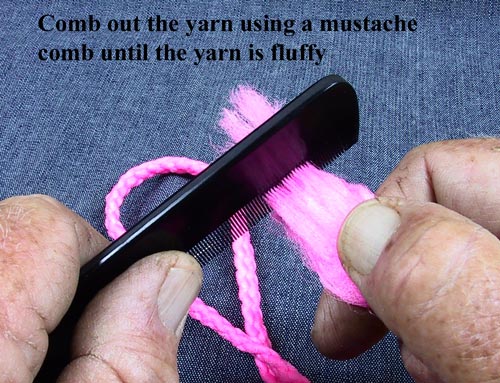
3] Mustache comb
Required Materials:
1] 12 to 20 lb. Maxima Chameleon Leader Material or equivalent
2] Piece of macramé cord
3] Krazy Glue or equivalent
Click for a larger photo.
To construct:
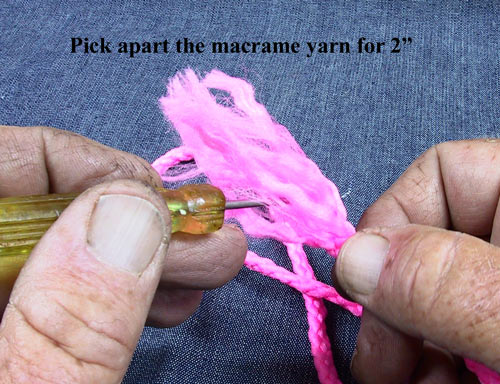
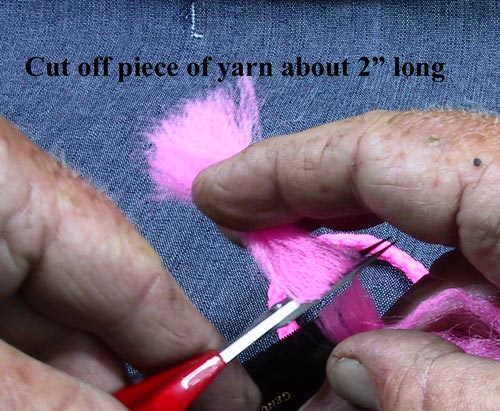
1] Pick apart the end of the macramé cord about 2” long.
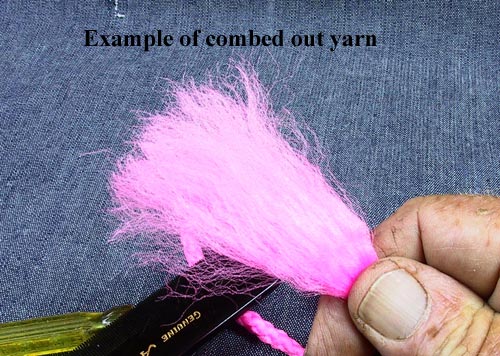
2] Using the mustache comb, comb out the yarn until the fibers are well
separated and fluffy.
3] Cut off a piece of the yarn about 3/16” in diameter and 2” long.
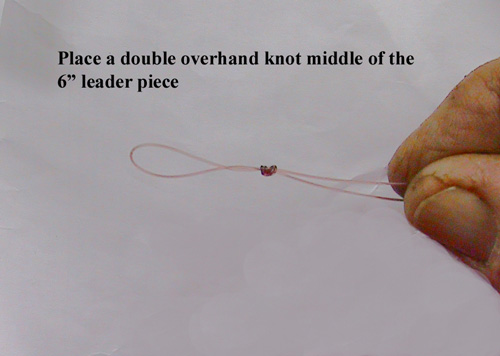
4] Cut off a piece of the leader material 6” long.
5] Place an overhand knot into the center of the leader material to make a loop
about 1” long.
6] Take the ends of the leader material and make a double overhand knot with an
OD of about ½” directly above the loop.
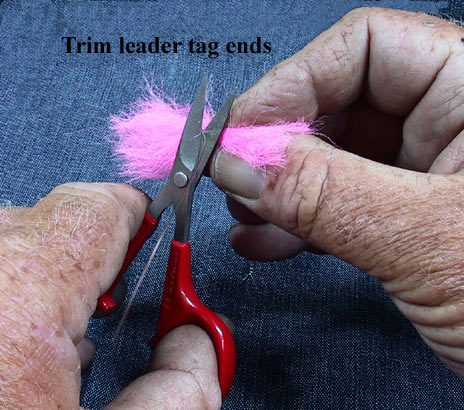
7] Place the previously prepared macramé piece into the double overhand knot
loop and pull the knot tight with the pliers.
8] Place another overhand knot directly above the first and pull tight with
the pliers making sure you keep the loop on one side of the yarn and the knot
directly opposite.
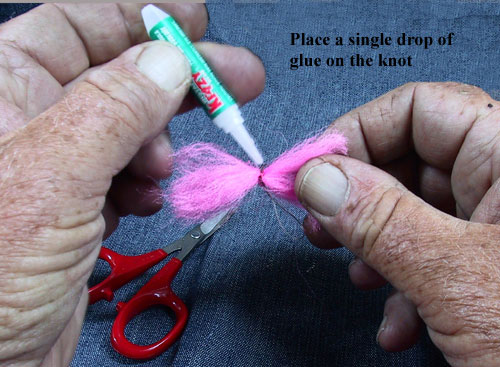
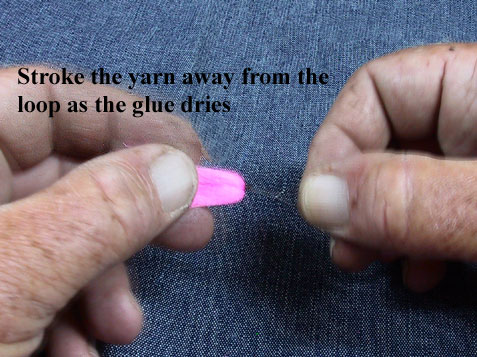
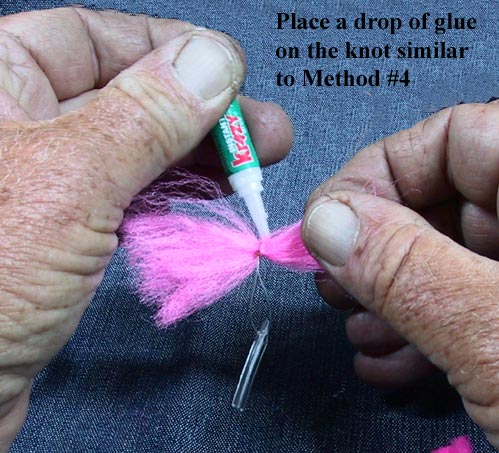
9] Carefully stroke the macramé yarn away from the knot area and
place 1 drop of Krazy glue at this point. One drop only as it will wick
up into the macramé yarn and destroy the fluffiness and hence
the floating abilities.
10] Leave the glue dry for a minute or so and then carefully stroke the
macramé yarn away from the loop.
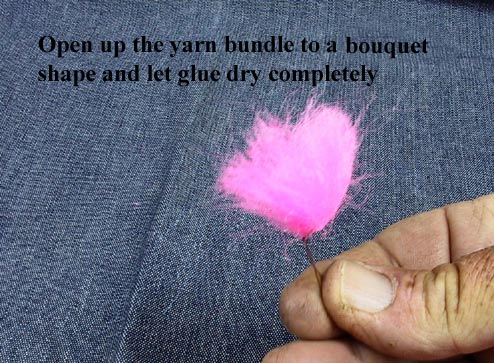
11] Roll the end of the macramé yarn between your fingers right at the knot
area making somewhat of a bullet shape.
12] Open up the macramé yarn into a bouquet.
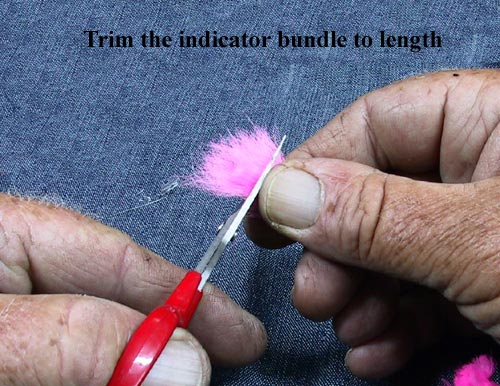
13] Let glue dry for 10 minutes or so and trim the yarn to about ¾”
14] Place a small amount of Gink or equivalent onto the indicator and work it in


Click for a larger photos and step by step instructions.
METHOD # 5 - 8>30’+ FOR DEEP WATER INDICATOR FISHING
Discussion and Use:
Over the past two summers, a deep-water indicator system was constructed and modified to allow a fly to be presented at any depth. Utilizing a yarn indicator similar to the Method #4, a quick disconnect system was developed where the indicator would slide up and down the leader allowing quick and easy adjustment for all water depths. While nearly all lakes suffer from the summer doldrums where the fish go deep, the use of this indicator system will produce fish all summer long. My experience shows that fish in the summer in Alberta trout lakes suspend off the bottom. This will occur from 15>18 feet in most lakes in water depths of 20 foot plus. Placing your fly directly within their feeding/holding areas will increase your chances for success. Not only will this system allow you to fish any water depth, it also incorporates weight utilizing small barrel swivels allowing you to use non-weighted flies W/0 beads or lead.
To use:
1] Remove your existing leader at the loop near the fly line.
2] Install the indicator system with the WD40 nozzle end towards the fly.
3] Attached your forceps to the fly and lower over-board with the line
sliding through your hands till the line gets slack. Hold the leader at
this point. This is the depth of water. You should be fishing about 18” to
2 feet from the bottom in water less than fifteen feet deep and further
off the bottom in deeper waters. Slide the yarn indicator down to this point
and pin it to the leader.
4] The butt section of the leader can be made nearly any length however
I’ve found that a butt section of 18 feet plus a leader tippet section of
8 feet will handle nearly all the deep water fishing encountered in Alberta
lakes. For fishing in the very deep clearwater lakes in British Columbia,
the butt section can be extended.
6] Once you have determined the depth required. Hold the WD40 piece in one
hand and pull about 2” of leader from the end of the Tygon tubing. Make a
loop of leader and force the end of the WD40 nozzle c/w leader loop back
into the Tygon tubing. Casting will not cause the leader loop to pull from
the Tygon tubing. A fish strike or playing a fish will have the loop pull
free of the Tygon tubing allowing both it and the WD40 nozzle to slide between
the leader loops.
Required tools:
1] Scissors
2] Smooth jaw pliers
3] Mustache comb
4] Very sharp knife
5] Needle capable of holding 25 lb. Leader Material
Required Materials:
1] Berkley Vansih or Seagar Fluorocarbon in 8>12 lb.
2] Piece of macramé cord
3] Krazy Glue or equivalent
4] Tygon tubing from a medical supply store. The tubing is from an airway management
system for children and is a clear plastic tubing. The kit I bought was manufactured
by Respan, Part # R-1300S Nasal Cannula-Kraton Infant Straight Tip 7 Ft Saflo Oxygen
Tube. Cost about $4.00 for the kit. Use the small diameter tubing for the indicator
system.
5] 3/4” inch piece of the red plastic extension nozzle for a can of WD 40.
6] A spool of Berkley Vanish 8 lb. spinning line monofilament. I found that Vanish
did NOT kink as badly as the cheap monofilament used previously thereby not requiring
replacement of the butt leader section.
7] One or two black-colored barrel swivels. in small sizes of #10 > # 14
8] A spool of 6 lb. & 8 lb. fluorocarbon tippet material.
9] Fly tying bobbin c/w flat 3/0 thread. Danville’s Monocord is best.
Construction is in four steps, fly line preparation, Tygon tubing/nozzle, yarn indicator and leader butt section. This is by far the most complex of the yarn type indicators to construct.
Fly line Preparation:
1] Utilizing a piece of butt leader section of approximately 16”, knot it to the
line with a nail knot. The leader used in the pictures of Maxima Chameleon 25 lb.
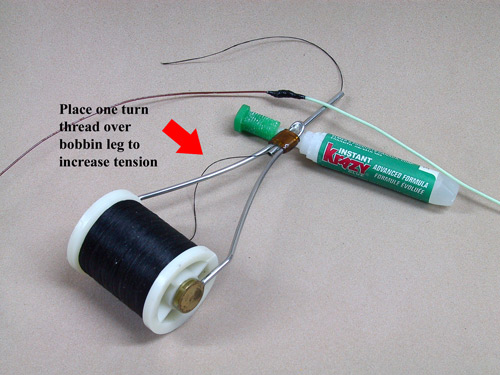
2] Put a loop over the bobbin leg to increase tension required to turn the spool.
3] Cut off a piece of the monocord about 6” long, hold it in the center and
pull till you get a loop prepared. Set it aside as you will need it to finish
the whipping knot.
4] While holding the thread exiting the bobbin with one hand grasp the nail knot
between both hands and let the bobbin dangle. Commence flipping the bobbin over
the knot while placing over-lapping thread layers. After about 15 turns, twist
the tail of the thread towards the knot end and lash down. Continue to flip
the bobbin around and around until you have covered all areas of the knot
plus a small area about 1/8” long in front and behind the knot.
5] Place the thread loop from 3] above onto the knot area and bind down with
about 6>8 more bobbin flips.
6] Cut off the bobbin leaving 3” of thread.
7] Run the 3” piece through the thread loop and pull the loop.
8] Cut the excess thread.
9] Put a couple of drops of Krazy Glue on the knot and roll between your fingers
for a couple of seconds. After the glue dries for 10 to 20 minutes, put another
couple of drops of Krazy glue on the knot and spread evenly with a toothpick.
Let it dry for 30 minutes.
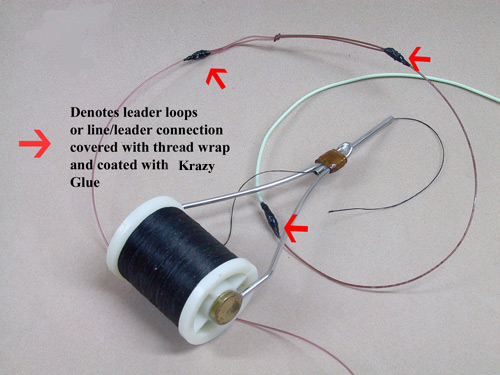
10] Place another loop at the end leader material and finish similarly to the
directions above.
Click for a larger photos and step by step instructions.
Preparation of Tygon Tubing, & WD 40 nozzle and Indicator.
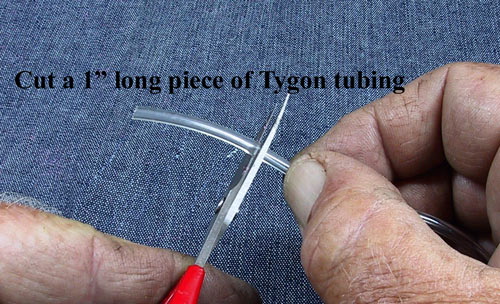
1] Cut a piece of Tygon tubing about 1” long from the airway kit.
2] Cut a piece about 3/4” long from the red WD 40 extension nozzle
3] Test fit the WD 40 piece inside the tygon tubing. Slide the red section in
about 1/8”. It should fit snuggly but not tight. The Tygon tubing will expand
slightly to allow insertion.
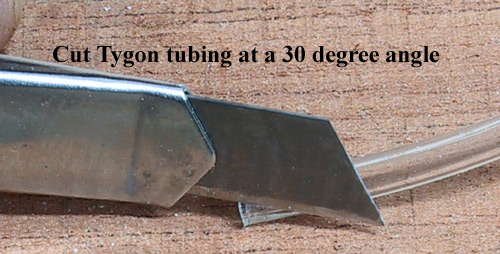
4] Using a sharp blade, cut the Tygon tubing at one end to slight angle so that
the opening is now about 3/8” long.
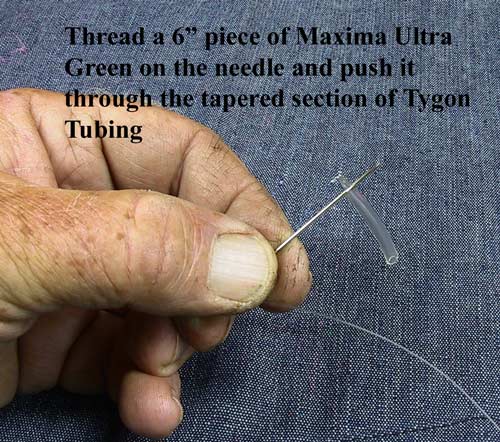
5] Cut a 6” section of Maxima Ultra Green Leader material and thread on the needle
6] Push the needle through the Tygon tubing near the end of the slight angle
in [4] about 1/8” in from the edge.
7] Remove the needle, even up the leader ends and make a double overhand knot
with a loop about ¾” OD and pull up tight

Click for a larger photos and step by step instructions.
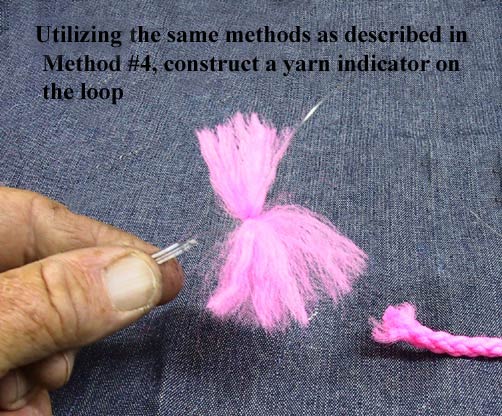
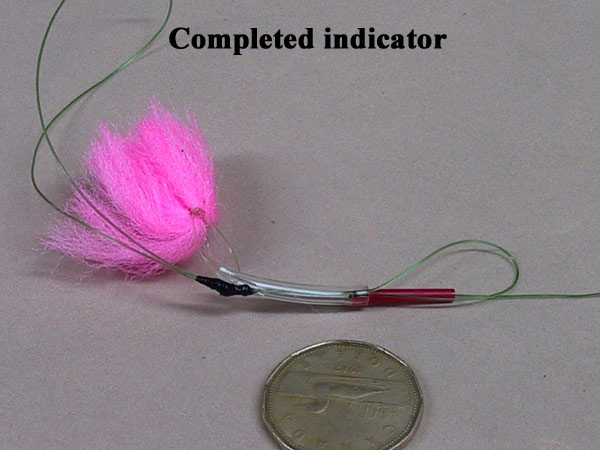
Yarn Indicator Preparation: This Method is similar to Method #4
1] Place a prepared yarn bundle into the leader tag ends left in Step #7 above
2] Complete the indicator as in Method # 4
Click for a larger photo.
Leader Butt Section Preparation
1] Cut a section of the Berkley Vanish 8 lb. test about 18’ 6” feet long.
2] Make a 3” diameter loop in the end of the Berkley Vanish with an overhand
knot trimming the leader ends neatly.
3] Put a thread loop over the bobbin leg to increase tension required to turn the spool.
4] Cut off a piece of the Monocord about 6” long, hold it in the center and pull till
you get a loop prepared. Set it aside as you will need it to finish the whipping knot.
5] While holding the thread exiting the bobbin with one hand grasp the overhand knot
between both hands and let the bobbin dangle. Commence flipping the bobbin over the
knot while placing over-lapping thread layers. After about 15 turns, twist the tail
of the thread towards the knot end and lash down. Continue to flip the bobbin around
and around until you have covered all areas of the knot plus a small area about 1/8”
long in front and behind the knot.
6]Place the thread loop from 4] above onto the knot area and bind down with about 6>8 more bobbin flips.
7] Cut off the bobbin leaving 3” of thread.
8] Run the 3” piece through the thread loop and pull the loop.
9] Put a couple of drops of Krazy Glue on the knot and roll between your fingers for a
couple of seconds. After the glue dries for 10 to 20 minutes, put another couple of drops
of Krazy glue on the knot and spread evenly with a toothpick. Let it dry for 30 min.
10] Slide the Tygon tubing c/w yarn indicator towards the 3” loop followed the red WD 40
nozzle prepared earlier. Make sure the “tapered end” of the Tygon tubing NOT the squared
end is slid on first.
11] Using one of the barrel swivels, construct a Lefty Kreh's non-slip loop at the other end of the 8
lb. Berkley Vanish.
12] Attach a 2’ length of 8 lb. Berkley Vanish to the other end of the barrel swivel.
13] Attach the second barrel swivel to the 8 lb. test using a non-slip knot.
14] Attach a 2’ length of 8 lb fluorocarbon to the barrel swivel
15] Attached using a surgeon’s knot an other 4’ length of 6 lb. fluorocarbon.
16] Attach your fly.

REALLY IMPORTANT STUFF!!!!
1] THREAD ON KNOTS – The thread over-wrapped on each of the knots allows the
fly line or leader butt to readily flow through the guides of your rod. If any
of the knots catch, you may loose a fish or pull off a guide.
2] LOOP STRETCHING – The loops in the leader must by pulled so that they are
elongated and quite slim. Connection between the fly and indicator must be as
straight as line as possible without kinks or loops. To elongate the leader
loops, place them over a over a nail or some type of smooth object and pull
hard. If you warm the leader by pouring hot water over the loop as you stretch
it, the loops will stay in their elongated shape. I’ve also used heat guns or
hair blowers @ low settings to warm the leaders.
3] THE TIPPET LENGTH from the bottom loop holding the deep water indicator system to
the fly should be a tad shorter that the length of your rod so you can land a fish
easily.
4] HOW TO RIG INDICATOR – Holding the WD 40 red nozzle in one hand, pull about 1 ½”
of leader between the Tygon Tubing and the nozzle. Pinch the leader over the end of
the nozzle and insert it into the Tygon tubing about 1/8”. Any sharp pull on the
leader will cause the leader to slip from between the nozzle and Tygon allowing
the nozzle and Tygon tubing to slide up and down the butt leader section at will.
5] Macreme yarn is no longer avaialbe @ every craft shop. There is an online store that sells the required yarn for the indicator.
https://pepperell.com/macrame-super-store/The yarn required is the 6MM matieral and it looks like this: 6MM
And there you have it. Five methods of increasing your success.
Enjoy,
Don
![]()